Custom sticker extension using Messages SDK - iMessage App store
In our previous article, we discussed about creating basic sticker extension for our iMessage App store. This step requires to create imgages but no coding effort.
Today, in this article we will discuss about creating a custom sticker extension and create stickers from the app.
Before diving in to the project, let's have a quick glance about the new classes provided by Apple for implementation.
MSMessagesAppViewController
The MSMessagesAppViewController class acts as the principal view controller for Messages extensions. Use this class to manage your extension.
MSStickerBrowserViewController
Use the MSStickerBrowserViewController to present the standard sticker browser. This browser provides drag-and-drop functionality. The user can press and hold a sticker to peel it from the browser, then drag the sticker to any balloon in the transcript. The user can also tap stickers to add them to the Messages app’s input field.
MSSticker
A sticker for use in the Messages app. A sticker can be sent as a new message or attached to an existing balloon in the transcript.
This demo project is created in iOS 10 sdk using XCode 8 beta
1. Create a new project. XCode - New - Project.
2. Select iMessage Application template.
3. Enter a project name. For this demo project I will be using CustomStickerExtension. Save the application.
4. The application template will create a folder, MessagesExtension folder and it will contain, MessagesViewController.swift file. This class is a subclass of MSMessagesAppViewController class. Any operation related to MSMessagesAppViewController will be handled in this class.
5. Create a new swift file, StickerViewController.swfit. This class should be inherited from MSStickerBrowserViewController class. Doing this will allow us to perform the sticker browser datasource APIs.
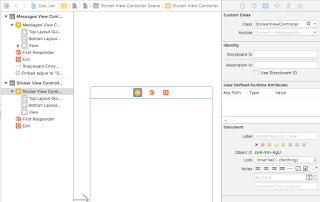
5. Select MainInterface.storyboard. Drag and drop a Container view to Message View Controller Scene.

6. Select the Container View Controller. Tap on the Inspector window, and change the class name to StickerViewController.
7. I have created few images for this demo project. I have added them directly under the Message Extension folder to the project. Copy the items if needed. The image names are defined as sticker1, sticker2,... which will easy to access in the code.

8. Now, you should select StickerViewController and start the attack.
9. Create an array to store the Stickers. This is required to pass this array as a input to MSStickerBrowserViewDataSource. In our project this array name is defined as,
var stickerArray = [MSSticker]()
we are going to store the MSSticker objects in an array.
10. Implement the MSStickerBrowserViewDataSource methods,
numberOfStickers(in stickerBrowserView: MSStickerBrowserView) -> Int
This method returns the number of stickers that will be created and shown in the extension view. Return type is Integer.
stickerBrowserView(_ stickerBrowserView: MSStickerBrowserView,
stickerAt index: Int) -> MSSticker
This method will return a MSSticker object for the particular index.
In our demo project the implementation of the above two data source methods will be as,
override func numberOfStickers(in stickerBrowserView: MSStickerBrowserView) -> Int {
return stickerArray.count
}
override func stickerBrowserView(_ stickerBrowserView: MSStickerBrowserView,
stickerAt index: Int) -> MSSticker {
return stickerArray[index]
}
As you can see, the numberOfStickers method will return the sticker array count and stickerBrowserView will return the MSSticker object based on the index.
11. Create a method, loadStickers() which will create the stickers and load on the view.
Create a for loop and get path for each image from the project. This path is required to create the stickers.
let imageName = "sticker\(i)"
let path = Bundle.main.path(forResource: imageName, ofType: "jpg")
let sticker: MSSticker
do {
let url = URL(fileURLWithPath: path!)
try sticker = MSSticker(contentsOfFileURL: url, localizedDescription: "Hello")
stickerArray.append(sticker)
} catch {
print(error)
return
}
12. Once the stickerArray is appended with stickers, we can now reload the view
stickerBrowserView.reloadData()
13. Now build and run the project. Press Command + R key.
14. Simulator will be launched and Message application will be opened.
15. Open a conversation.

16. Tap on the AppStore button.

17. Now you should see the Custom Sticker icon. Tap on it to launch the stickers.

The stickers will now be loaded in the extension area. Tap on any sticker and add an optional message.

Tap on send button to share with your friends.

To summarise today's article, we have created a custom sticker extension using Messages SDK. This extension will be available in iMessage app store. Based upon the requirements, the stickers shown to the user can be customised and displayed on the view. In our next article we will discuss about how to create a custom iMessage extension. We can do lot more than just stickers. Stay tuned.
The source code is available in github.
Follow me on Twitter @mcabasheer
Today, in this article we will discuss about creating a custom sticker extension and create stickers from the app.
Before diving in to the project, let's have a quick glance about the new classes provided by Apple for implementation.
MSMessagesAppViewController
The MSMessagesAppViewController class acts as the principal view controller for Messages extensions. Use this class to manage your extension.
MSStickerBrowserViewController
Use the MSStickerBrowserViewController to present the standard sticker browser. This browser provides drag-and-drop functionality. The user can press and hold a sticker to peel it from the browser, then drag the sticker to any balloon in the transcript. The user can also tap stickers to add them to the Messages app’s input field.
MSSticker
A sticker for use in the Messages app. A sticker can be sent as a new message or attached to an existing balloon in the transcript.
This demo project is created in iOS 10 sdk using XCode 8 beta
Requirement
In our demo project we will create nature images as stickers and allow the user to select the sticker and share with friends using iMessage app.1. Create a new project. XCode - New - Project.
2. Select iMessage Application template.
3. Enter a project name. For this demo project I will be using CustomStickerExtension. Save the application.
4. The application template will create a folder, MessagesExtension folder and it will contain, MessagesViewController.swift file. This class is a subclass of MSMessagesAppViewController class. Any operation related to MSMessagesAppViewController will be handled in this class.
5. Create a new swift file, StickerViewController.swfit. This class should be inherited from MSStickerBrowserViewController class. Doing this will allow us to perform the sticker browser datasource APIs.
5. Select MainInterface.storyboard. Drag and drop a Container view to Message View Controller Scene.

6. Select the Container View Controller. Tap on the Inspector window, and change the class name to StickerViewController.

7. I have created few images for this demo project. I have added them directly under the Message Extension folder to the project. Copy the items if needed. The image names are defined as sticker1, sticker2,... which will easy to access in the code.

8. Now, you should select StickerViewController and start the attack.
9. Create an array to store the Stickers. This is required to pass this array as a input to MSStickerBrowserViewDataSource. In our project this array name is defined as,
var stickerArray = [MSSticker]()
we are going to store the MSSticker objects in an array.
10. Implement the MSStickerBrowserViewDataSource methods,
numberOfStickers(in stickerBrowserView: MSStickerBrowserView) -> Int
This method returns the number of stickers that will be created and shown in the extension view. Return type is Integer.
stickerBrowserView(_ stickerBrowserView: MSStickerBrowserView,
stickerAt index: Int) -> MSSticker
This method will return a MSSticker object for the particular index.
In our demo project the implementation of the above two data source methods will be as,
override func numberOfStickers(in stickerBrowserView: MSStickerBrowserView) -> Int {
return stickerArray.count
}
override func stickerBrowserView(_ stickerBrowserView: MSStickerBrowserView,
stickerAt index: Int) -> MSSticker {
return stickerArray[index]
}
As you can see, the numberOfStickers method will return the sticker array count and stickerBrowserView will return the MSSticker object based on the index.
11. Create a method, loadStickers() which will create the stickers and load on the view.
Create a for loop and get path for each image from the project. This path is required to create the stickers.
let imageName = "sticker\(i)"
let path = Bundle.main.path(forResource: imageName, ofType: "jpg")
let sticker: MSSticker
do {
let url = URL(fileURLWithPath: path!)
try sticker = MSSticker(contentsOfFileURL: url, localizedDescription: "Hello")
stickerArray.append(sticker)
} catch {
print(error)
return
}
12. Once the stickerArray is appended with stickers, we can now reload the view
stickerBrowserView.reloadData()
13. Now build and run the project. Press Command + R key.
14. Simulator will be launched and Message application will be opened.
15. Open a conversation.

16. Tap on the AppStore button.

17. Now you should see the Custom Sticker icon. Tap on it to launch the stickers.

The stickers will now be loaded in the extension area. Tap on any sticker and add an optional message.

Tap on send button to share with your friends.

To summarise today's article, we have created a custom sticker extension using Messages SDK. This extension will be available in iMessage app store. Based upon the requirements, the stickers shown to the user can be customised and displayed on the view. In our next article we will discuss about how to create a custom iMessage extension. We can do lot more than just stickers. Stay tuned.
The source code is available in github.
Follow me on Twitter @mcabasheer

Comments
Post a Comment